1. Install OmpSs-2@FPGA toolchain
This page should help you install the OmpSs-2@FPGA toolchain. However, it is preferable using the pre-build Docker image with the latest stable toolchain. They are available at DockerHUB. Moreover, we distribute pre-built SD images for some SoC. Do not hesitate to contact us at ompss-fpga-support@bsc.es if you need help.
First, it describes the prerequisites to do the toolchain installation. After that, the following sections explain different approaches to do the installation.
1.1. Prerequisites
Git Large File Storage (https://git-lfs.github.com/)
Python 3.7 or later (https://www.python.org/)
Vendor backends: - Xilinx Vivado 2021.1 or later (https://www.xilinx.com/products/design-tools/vivado.html)
1.1.1. Git Large File Storage
AIT repository uses Git Large File Storage to handle relatively-large files that are frequently updated (i.e. hardware runtime IP files) to avoid increasing the history size unnecessarily. You must install it so Git is able to download these files.
Follow instructions on their website to install it.
1.1.2. Vendor backends - Xilinx Vivado
Follow the installation instructions from Xilinx Vitis HLS and Vivado. You will need to enable support for the devices you’re working on, as well as install the board files for the given devices.
1.1.3. QDMA PCIe linux drivers
QDMA drivers are needed for alveo PCIe-attached devices.
These drivers can be downloaded from the AMD PCIe driver github
The kernel module as well as the userspace utilities (dma-ctl) are required.
1.1.4. Zynq/ZynqMP linux drivers
See Kernel module
1.2. Stable release
There is a meta-repository that points to latest stable version of all tools: https://github.com/bsc-pm-ompss-at-fpga/ompss-2-at-fpga-releases. It contains a Makefile which, based on some environment variables, will compile and install the toolchain. The environment variables are:
TARGET[Def:native] Linux architecture that toolchain will targetPREFIX[Def:/] Installation prefix for the toolsPREFIX_HOST[Def:PREFIX] Installation prefix for the host tools (i.e. llvm, ait)PREFIX_TARGET[Def:PREFIX] Installation prefix for the target tools (i.e. nanos6, libxdma, libxtasks, ovni)PLATFORM[Def:qdma] Board platform for execution. Supported platforms: zynq, qdma.XTASKS_PLATFORM[Def:PLATFORM] Board platform that xtasks backend will target. Supported backends: zynq, qdma.XDMA_PLATFORM[Def:PLATFORM] Board platform that xdma backend will target. Supported backends: zynq, qdma.BUILDCPUS[Def:nproc] Number of processes used for building
make help provides an exhaustive list of supported configuration variables and targets.
1.2.1. Native build
The following example will build the toolchain for the current native architecture and an Alveo support and install it in /opt/bsc/ompss-2.
git clone --recursive https://github.com/bsc-pm-ompss-at-fpga/ompss-2-at-fpga-releases.git
cd ompss-2-at-fpga-releases
export PREFIX=/opt/bsc/ompss-2
export PLATFORM=qdma
make
1.2.2. Cross-compiling toolchain
The following example will cross-build the toolchain to generate binaries that can run in the aarch64-linux-gnu architecture and install it in /opt/bsc/host-arm64/ompss-2 and /opt/bsc/arm64/ompss-2:
git clone --recursive https://github.com/bsc-pm-ompss-at-fpga/ompss-2-at-fpga-releases.git
cd ompss-2-at-fpga-releases
export TARGET=aarch64-linux-gnu
export PREFIX_HOST=/opt/bsc/host-arm64/ompss-2
export PREFIX_TARGET=/opt/bsc/arm64/ompss-2
export PLATFORM=zynq
make
1.3. Individual git repositories
The master branches of all tools should generate a compatible toolchain.
Each package should contain information about how to compile/install itself, look for the README files.
The following points briefly describe each tool and provide a possible build configuration/setup for each one.
We assume that all packages will be installed in a Linux OS in the /opt/bsc/arm64/ompss-2 folder.
Moreover, we assume that the packages will be cross-compiled from an Intel machine to be run on an ARM64 embedded board.
- List of tools to install:
1.3.1. Accelerator Integration Tool (AIT)
You can install the AIT package through the pip repository python3 -m pip install ait-bsc or cloning the git repository:
git clone https://github.com/bsc-pm-ompss-at-fpga/ait
cd ait
git lfs install
git lfs pull
export AIT_HOME="/path/to/install/ait"
export DEB_PYTHON_INSTALL_LAYOUT=deb_system
python3 -m pip install . -t $AIT_HOME

export PATH=PREFIX/ait/:$PATH
export PYTHONPATH=$AIT_HOME:$PYTHONPATH
1.3.2. Kernel module
The driver is only needed to execute the applications. To compile them, the library must be installed on the host but the kernel module may not be loaded. Example to cross-compile the driver:
git clone https://github.com/bsc-pm-ompss-at-fpga/ompss-at-fpga-kernel-module.git
cd ompss-at-fpga-kernel-module
export CROSS_COMPILE=aarch64-linux-gnu-
export KDIR=/home/my_user/kernel-headers
export ARCH=arm64
make
1.3.3. XDMA
Example to cross-compile the library and install it in the /opt/bsc/arm64/ompss-2/libxdma folder:
git clone https://github.com/bsc-pm-ompss-at-fpga/xdma.git
cd xdma/src/zynq
export CROSS_COMPILE=aarch64-linux-gnu-
export KERNEL_MODULE_DIR=/path/to/ompss-at-fpga/kernel/module/src
make
make PREFIX=/opt/bsc/arm64/ompss-2/libxdma install
1.3.4. xTasks
Example to cross-compile the library and install it in the /opt/bsc/arm64/ompss-2/libxtasks folder:
git clone https://github.com/bsc-pm-ompss-at-fpga/xtasks.git
cd xtasks/src/zynq
export CROSS_COMPILE=aarch64-linux-gnu-
export LIBXDMA_DIR=/opt/bsc/arm64/ompss-2/libxdma
make
make PREFIX=/opt/bsc/arm64/ompss-2/libxtasks install
1.3.5. ovni
Example to cross-compile the library and install it in the /opt/bsc/arm64/ompss-2/libovni folder:
git clone https://github.com/bsc-pm-ompss-at-fpga/ovni.git
mkdir ovni-build
cd ovni-build
cmake \
  -DCMAKE_INSTALL_PREFIX=$(PREFIX_TARGET)/libovni \
  -DUSE_MPI=OFF \
  -DCMAKE_C_COMPILER=aarch64-linux-gnu-gcc
../ovni
make
make install
1.3.6. Nanos6-fpga
Example to cross-compile the runtime library and install it in the /opt/bsc/arm64/ompss-2/nanos6-fpga folder:
git clone https://github.com/bsc-pm-ompss-at-fpga/nanos6-fpga.git
cd nanos6-fpga
./autogen.sh
mkdir build-fpga-arm64
cd build-fpga-arm64
../configure --prefix=/opt/bsc/arm64/ompss-2/nanos6-fpga --host=aarch64-linux-gnu \
  --enable-fpga \
  --with-xtasks=/opt/bsc/arm64/ompss-2/libxtasks \
  --with-ovni=/opt/bsc/arm64/ompss-2/ovni \
  --disable-discrete-deps \
  --disable-all-instrumentations \
  --enable-stats-instrumentation \
  --enable-verbose-instrumentation \
  --enable-ovni-instrumentation
make
make install
1.3.7. LLVM/Clang
Example to build a LLVM/Clang cross-compiler that runs on the host and creates binaries for another platform (ARM64 in the example):
git clone https://github.com/bsc-pm-ompss-at-fpga/llvm.git
mkdir build-fpga
cd build-fpga
cmake -G Ninja \
  -DCMAKE_INSTALL_PREFIX=/opt/bsc/host-arm64/ompss-2/llvm \
  -DLLVM_TARGETS_TO_BUILD="AArch64" \
  -DCMAKE_BUILD_TYPE=Release \
  -DCLANG_DEFAULT_NANOS6_HOME=/opt/bsc/arm64/ompss-2/nanos6-fpga \
  -DLLVM_USE_SPLIT_DWARF=ON \
  -DLLVM_ENABLE_PROJECTS="clang" \
  -DLLVM_INSTALL_TOOLCHAIN_ONLY=ON \
  -DCMAKE_C_COMPILER=clang \
  -DCMAKE_CXX_COMPILER=clang++ \
  -DLLVM_USE_LINKER=lld \
../llvm/llvm
nina
ninja install
1.4. Alveo hardware setup
OmpSs-2@FPGA loads bitstreams using jtag. Therefore, a USB port needs to be connected from the host to the FPGA.
The following images show the location of the USB port on the PCIe back plate of Alveo cards.
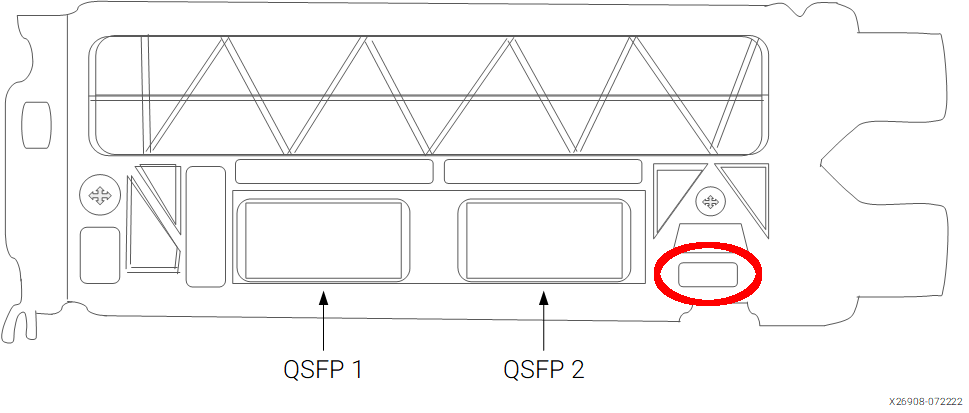
Location of the USB port on an Alveo U200/U250
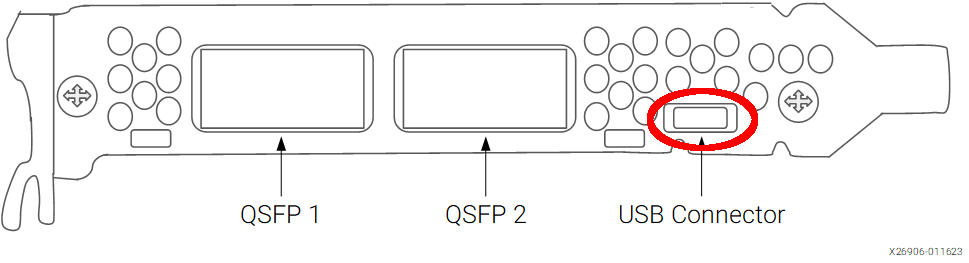
Location of the USB port on an Alveo U55c
Once connected, you should be able to see the USB-UART device using lsusb:
> lsusb -d 0403:6011
Bus 001 Device 003: ID 0403:6011 Future Technology Devices International, Ltd FT4232H Quad HS USB-UART/FIFO IC
Then appropriately set RW permissions for the USB devices.
The previous lsusb also shows the device bus and device, therefore, the device file for the previous lsusb output is:
/dev/bus/usb/001/003
Then vivado should be able to access JTAG targets. The following Vivado tcl script connects lists available hardware targets and jtag devices:
open_hw_manager
connect_hw_server
get_hw_targets
foreach target [get_hw_targets] {
    open_hw_target $target
    puts $target
    puts [get_hw_devices]
}
It can be run in batch mode, or pasted into the command shell in the gui (or in tcl mode).
vivado -nolog -nojournal -batch -source test_hw_server.tcl
It should print, among other output, something like this:
...
...
INFO: [Labtoolstcl 44-466] Opening hw_target localhost:13330/xilinx_tcf/Xilinx/21290594G00LA
localhost:13330/xilinx_tcf/Xilinx/21290594G00LA
xcu200_0
INFO: [Common 17-206] Exiting Vivado at Tue Feb 17 17:56:06 2026...
1.5. Zynq and ZynqMP hardware setup
Current OmpSs-2@FPGA toolchain supports both Zynq (zynq702, zynq706, zybo and zedboard) and ZynqMP (zcu102 and Kria kv260) boards.
1.5.1. Prepare the SD card
SD images based on Ubuntu cloud with the preinstalled toolchain are distributed. They can be downloaded from the OmpSs-2@FPGA SD download page
Once downloaded, dump the image into the SD card. A 4GB SD card or bigger is required.
gunzip < image.img.gz | dd of=/dev/mmcblk0 bs=16M status=progress
This uncompresses the downloaded image file using gunzip and sends it do dd to write it on the device.
Two partitions are created: boot and rootfs.
Setting up the boot partition
The boot partition (mmcblk0p1) contains the files required to boot the board.
These files consists on:
First Stage Bootloader (FSBL)
Linux kernel
Device-tree
Bitstream
Inside the OmpSs-2@FPGA SD image boot partition there will be a folder for each of the supported boards containing all the required boot files.
In order to boot a specific board, you must copy the files from inside the corresponding folder to the root of the boot partition. For example, to boot a ZCU102 board, you must run:
BOOT_DIR=$(udisksctl mount --block-device /dev/mmcblk0p1)
cp ${BOOT_DIR}/boot-zcu102/* ${BOOT_DIR}/
udisksctl unmount --block-device /dev/mmcblk0p1
Setting up the rootfs
The rootfs partition (mmcblk0p2) contains a Ubuntu 24.04 root filesystem.
There is a systemd service configured to initialize the board with an example bitstream which implements a dotproduct computation and to load the OmpSs-2@FPGA kernel module for the corresponding kernel version.
To set up Ubuntu for a specific board, you must create a soft-link to the bitstream and ko files that the systemd service has to load. Following the example of the ZCU102, you must do:
ROOTFS_DIR=$(udisksctl mount --block-device /dev/mmcblk0p2)
pushd ${ROOTFS_DIR}/opt/init_fpga/
ln -s bitstream-zcu102/bitstream.bin bitstream.bin
ln -s ompss-fpga-6.1.30-xilinx-v2023.2.ko ompss-fpga.ko
popd
udisksctl unmount --block-device /dev/mmcblk0p2